Thursday, August 30, 2012

My Greatest Gardening Challenge Nets My Greatest Gardening Discovery


I was not expecting to move this summer.  We'd started our seeds over winter, planted the seedlings in the ground (and in planters) and were nurturing them along when life said, “don't get too comfortable, now.”

Challenge:  can one move mature garden vegetables successfully?  My instincts told me “no.”  I've gardened most of my life.  I've never transplanted anything in the middle of summer.  That would be begging for trouble.

A googling I went.  Sure enough, there was a how-to video for moving mature tomato plants.  If it works for tomatoes, it should work for peppers, right?  According to the video, we needed to prep the plants by digging around them and breaking their roots, letting them recover from that shock in their original positions by watering them thoroughly over the next two weeks before removing and transplanting.

I would not be moving the plants to another garden plot, though.  I would be transplanting them to planters.  Tomatoes are large plants that need a lot of soil for their roots and plenty of nutrients to support their intense, rapid growth and fruiting.

A project that had been tickling at the back of my mind for over a year was sub-irrigated planters. During my mid-winter gardening research (if I can call stumbling about the Internet somewhat haphazardly 'research') I came across Bob Hyland's Flickr photostream of his research and work with sub-irrigated planters.  Bob is the founder of the Center for Urban Greenscaping and has spent years perfecting the way he makes sub-irrigated planters (SIPs). His photostreams showed convincing results (coffee trees in New York!)  that compelled me to give SIPs a try.  The instructions are sketchy in his photostreams, however, and I felt no confidence in moving forward.  When life suggested I get moving, the time was right to give these sub-irrigated planters a go.  I worked from memory knowing my memory was shoddy at best.  I managed to mash the instructions for smaller SIPs with the instructions for larger SIPs, but the results two months later are great.  From memory, I needed a reservoir for the water, wicking material to draw the water into the planters, and a pipe of some sort to be able to add water to the reservoir without dismantling the planter.  I had forgotten an overflow hole (remedied quickly with a drill).

I gathered food-grade plastic five gallon buckets for the tomatoes and other, smaller ones for the peppers.  Since the pepper plants were small and easy to work around, we transplanted those first.  Once they were in the planters we positioned the planters in mostly shade and watched for signs of shock.  One plant pouted a bit – the leaves and stems were droopy that day and the next.  By the third day, the droopy plant was fine as were all the other pepper planters.  This was back in June.

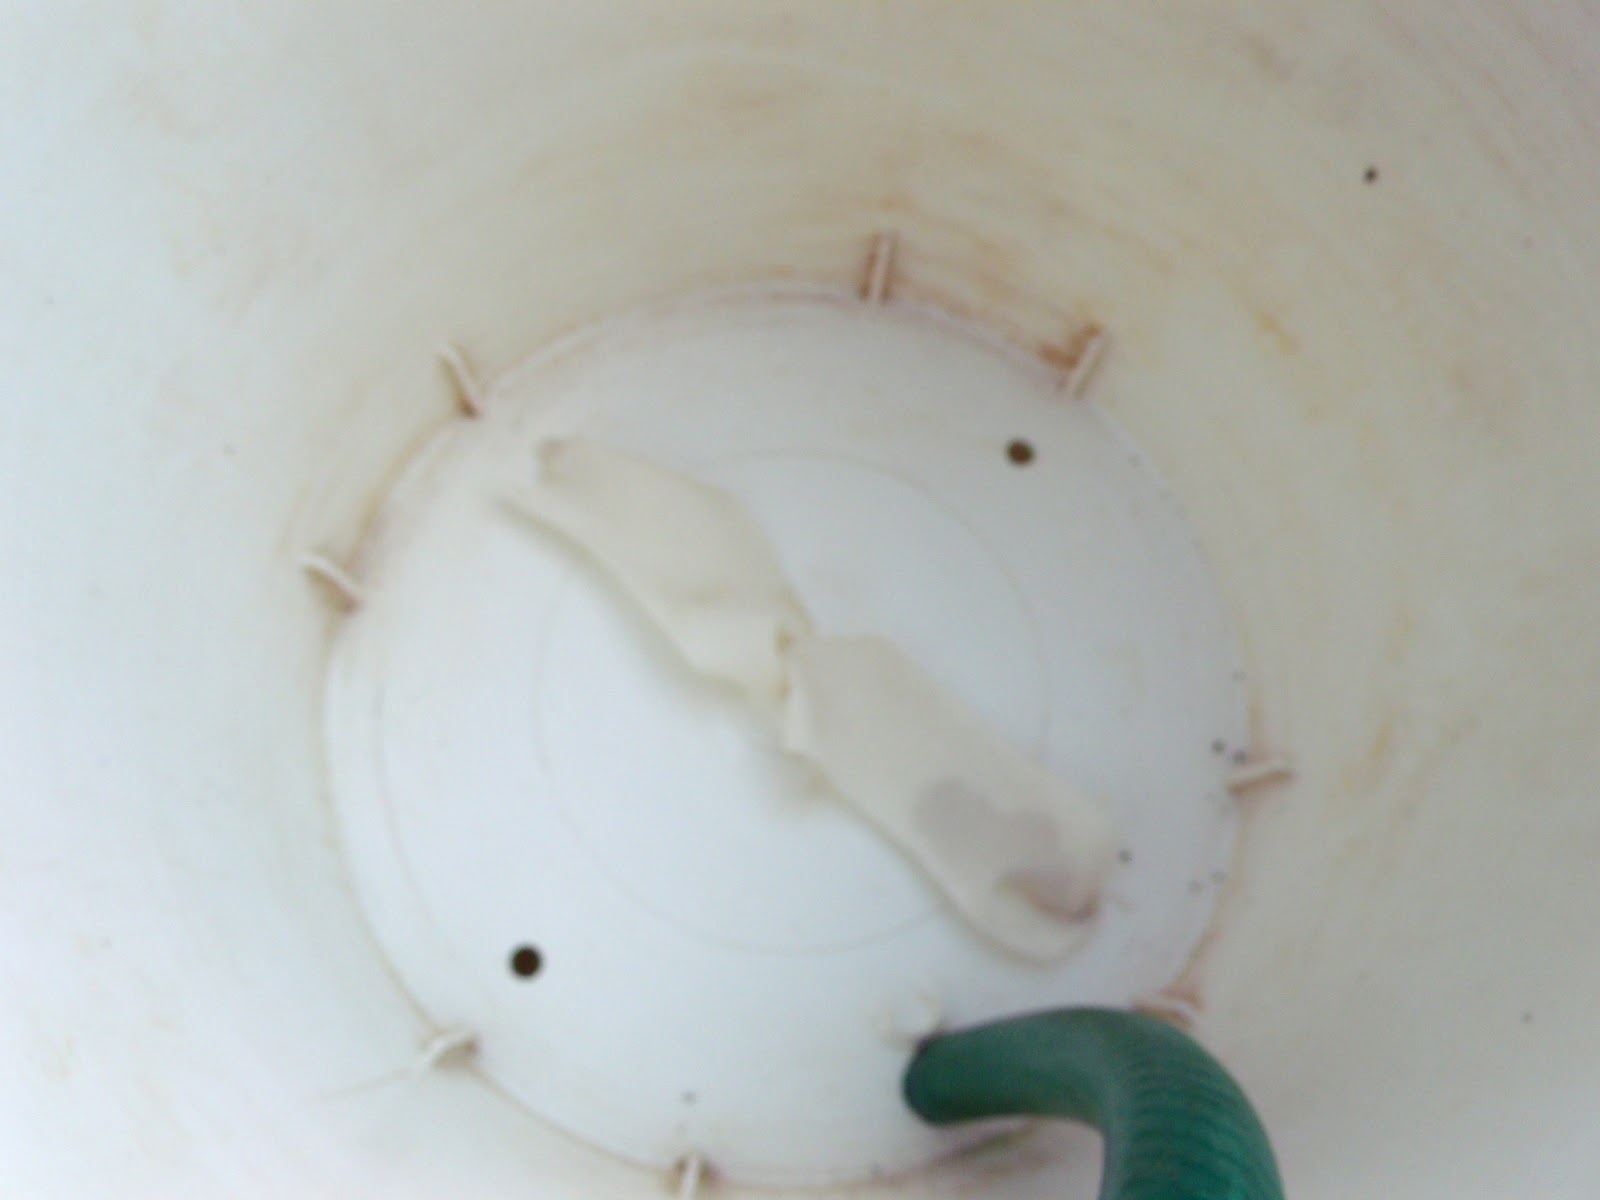
Inside of planter bucket.  Wicking material is poly fabric.  Section of garden hose  is  used for refilling the reservoir.
Wicking material hangs down into water of reservoir.  (This is the part I got wrong, but seems to have worked throughout this season.) 
Newly transplanted.  
I use a funnel to add water.   
We went on to transplant 12 pepper plants with equal results and three tomato plants.  The tomatoes were enormous!  They wilted terribly when moved, despite having prepared them 10 days previous.  We stopped at the third plant because we didn't think they were going to make it.  During the actual move, one of the tomato plants dropped 30 green tomatoes.  I thought for sure these plants were going to succumb to the shock and die.
It's a beast! 
They did not!  They rallied and within a week were no longer wilted or drooping.  I damaged one of the plants trying to stake it after transplanting it when it was wilting so severely.  I broke several branches and decided to stop there and never staked it.  Of course, none of this was ideal for the tomatoes.  Saving the three plants we did, we've been able to put up enough sauce and chopped tomatoes for a winter's worth of spaghetti, soups, and chili!

All the planters in their new home. 
The peppers, though, have behaved as if nothing ever happened.  They've produced heavily.   I did not have time to make all the transplant containers sub-irrigated and not knowing if SIPs would make much difference anyway, several of the planters are just regular drain-holes-in-the-bottom planters.   And this is where my big discovery comes in.  Since June in record-high temperatures with record-low rainfall, I have had to add water to the sub-irrigated planters TWICE!  Twice!  The regular planters all must be watered daily, twice a day on very hot days!  Not the sub-irrigated planters.  This is astounding!  I do fertilize with a liquid fish and seaweed emulsion once a week for the peppers, but that is it.  Every day I check my planters and every day the soil in the SIPs is moist.  This is a Very Big Deal!  I imagine I save about a gallon of water a day on each sub-irrigated planter.  The plants in them are happy, healthy, and incredibly productive!

SIP on left.  Standard planter on right.  Note how dark and glossy the leaves are on the SIP and how pale the leaves are on the pepper in the standard planter.  Soil is the same.  Fertilizing schedule is the same.  The only difference is the water reservoir on the SIP.  (Can you see I added an overflow hole on the SIP bucket? )

You can bet every planter I make from now on will be sub-irrigated!


 As a PS, I don`t want anyone to confuse or conflate SIPs with self-watering planters.  You can buy self-watering planters just about anywhere now-a-days, but commercially produced SIPs are hard to come by.  Earthbox is one and there are others. I have several self-watering planters and my experience with them is that they don`t make much difference at all from standard planters.  Using them outdoors, I need to water as frequently as I do with any of the standard planters.  I suspect that the large fill hole in the side of the planter allows for evaporation.

This is a self-watering planter with 4 peppers in it.   The seashells are only there to keep the squirrels from digging.  I overcrowded this planter and clearly not enough nutrients are getting to the one super cherry plant in the foreground.  (There are four pepper plants in this planter.  Ideally, there would only be one.  These are not transplants, however.  They started out this way.) 

I'm sure the reservoir hole allows for evaporation.  I have to fill this daily, sometimes twice daily.  

Thursday, May 31, 2012

Squirrels! BAH!

Squirrels are the bane of my gardening existence.  They dig out seeds I've just planted.  Chew the tops off pepper plants, tomato plants, and sunflowers!  I sometimes wonder if they're doing me a favor as topping those plants causes them to be bushier -- including the sunflowers!  Instead of a single flower head, there will be many when the squirrels have chewed the tops from one.  They dig out newly planted plants, too.  They dig in all my planters, leaving heaps of dirt all over the place!

I know.  I probably shouldn't feed him if he gives me so much trouble.  This table is on my porch just outside one kitchen window where the cats like to lounge.  Feeding him here is great entertainment for the cats.  Although, two of my cats go outdoors and I do have (expletive laced) video of my 24-pound tuxedo cat sitting lazily only 4 inches away from the squirrel watching him with mild curiosity.  


Every year I search for ways to stop the squirrels' destruction.  Usually I cover the tops of my planters with rocks and shells I've gathered from the beaches.  This does stop them from digging in those.  I'm never surprised when a bean plant starts growing in a row where I did not plant beans.  It's nothing I did.  It's the squirrel's doing.  

This is my potted blueberry.  We amended the soil to reach the correct pH and still it was a little sweeter than blueberries prefer.  So I started taking my coffee grounds out to the planter in the mornings to help increase the acidity.  What do you know?  When I added coffee grounds to the top of the planter, the squirrel stopped digging.  It's a good thing I love coffee!  I'll be spreading these everywhere! 


This chili pepper planter is covered in clam shells.  The bit of soil on the porch was from the squirrel's last dig before I added the shells.

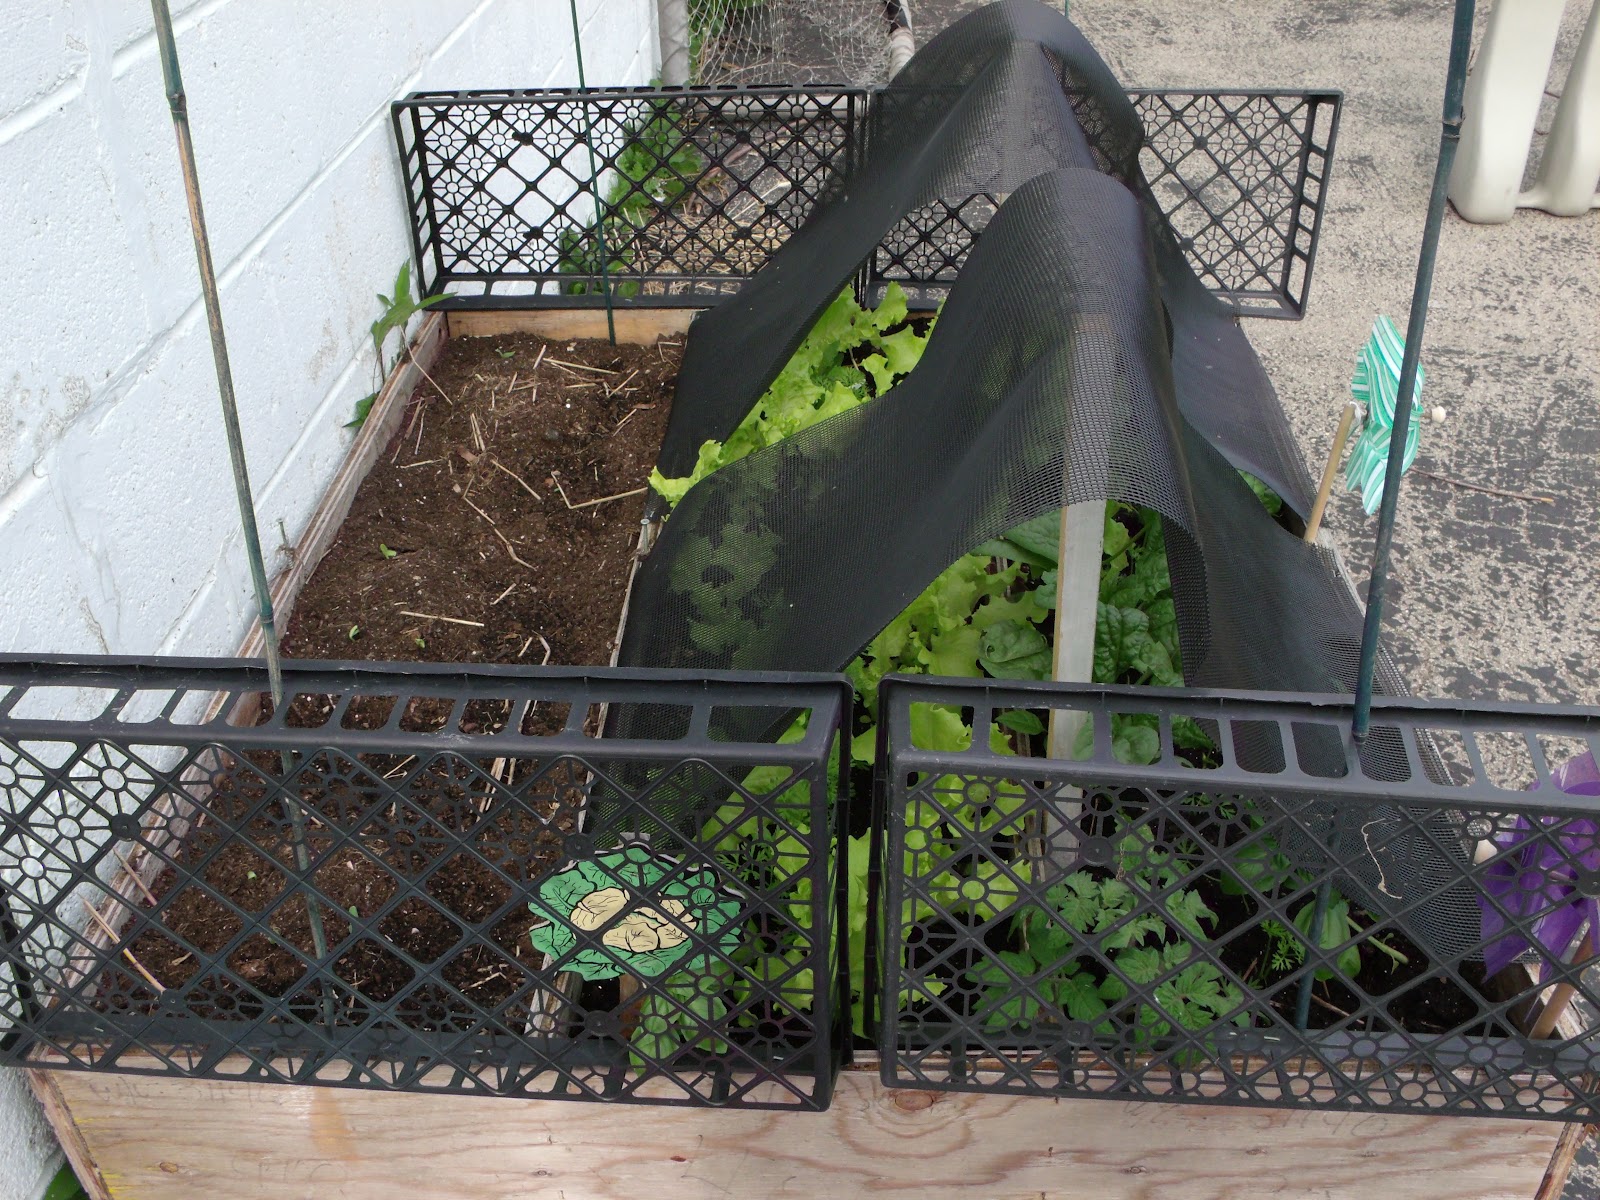
Last year, I lost most of the spinach in my salad box to the squirrels.  They would dig it up, eat it, just make a wreck of the whole box.  This year, I sprouted everything under bird netting.  Once it got too tall for the bird netting, I removed the bird netting.  As soon as I did, holes everywhere!  Squirrels!  Bah!  I moved my salad box from a too shady location to a too sunny location, so had to give my lettuce and spinach some shade.

The squirrels aren't afraid to climb in on the sides and dig, or even in the small, two-inch gap between the two shades!  So we had to make some more modifications before we could start our cucumbers in the back row.  (In this picture you can see the leeks that overwintered in this box.  They were TASTY!  Normally leeks wouldn't survive a winter in this region, but last year's winter was incredibly mild.)


These are trays from garden centers used to hold all the cell packs of flowers and such.  I knew I hung onto them for a reason!  (They come in handy for harvesting.)  We stapled these to the sides of the box to keep the squirrels out.  It's working.  Look how happy the lettuce is, too!

The cukes are sprouting happily.  And the squirrel isn't going to get them!  

Tuesday, May 22, 2012

Weed 'em and Reap!

Does your yard look like mine?


Yes, the dandelions are winning.  No doubt this is thanks to my dandelion loving youngest child who spreads seeds around with abandon every year.  Last year, he requested a dandelion birthday cake.  He really loves dandelions!  

What to do when you have an abundance of dandelion blossoms?  Make dandelion wine!  Which is exactly what we did.  

I was lucky to have come across the recipe the way I did.  I was leafing through one of my old cookbooks (The New York Times Heritage Cookbook, 1972 edition) for inspiration and came across several dandelion recipes days before the dandelions were in full bloom.  The recipe was simple and I figured "Why not?"

I'm sure the neighbours thought we were nuts out there plucking dandelion blooms and putting them into a 2-quart sized Easter bucket!  I found it was easiest to just slip two fingers beneath the bloom and pull up in order to get only blossom and no stem.  You don't want any stems, just blossoms.  Read the whole recipe before you get started as this is a several-day process (but easy!)

Dandelion Wine

4 quarts boiling water
4 quarts dandelion blossoms, washed
3 lemons
3 oranges
3.5 pounds sugar (8 cups)
1/2 cake compressed yeast or one and one-half teaspoons active dry yeast, dissolved in two tablespoons lukewarm water

  1. Pour the boiling water over the washed blossoms (I simply added the blossoms to the pot of boiling water and stirred to submerge them all) and return to a boil.  Cool and set aside, covered, for three days.  (I covered with the pot lid and let it sit on a back burner for the three days.)  
  2. Strain, discarding blossoms (put these right in the compost bin or even directly on the garden, they won't go to seed now that they've been cooked!) 
  3. Cut the colored rind from the lemons and oranges (wash them well then use a very fine peeler or paring knife to remove ONLY the colored rind and NONE of the white pith -- try to get no white at all).  Add the colored rinds to to the strained liquid.  Bring to a boil and boil fifteen minutes.  
  4. Juice the orange and lemons and add the juice and pulp and sugar to the liquid and stir well.  (The oranges and lemons fall apart using a hand juicer, it's messy but it will do the job.)  Cool.  
  5. After it has cooled, add the yeast and pour the brew in a container to ferment in a cool place for a week to ten days.  I used a plastic gallon jug to ferment mine in.  I had about 4 inches of space in the top of the container and yes it expanded and it bubbled over a little bit.  I only had the screw-cap top on.  Anyone who makes wine regularly says to use a fermentation lock, which will fit on top of a gallon container - usually glass.  I recall my parents making wine and using balloons in place of the fermentation lock.  Poke several holes in the top of the balloon, fit it to the top of the container and let the balloon fall inside the jug.  It will raise with the carbon dioxide which will escape the holes.  When it deflates completely, it's done.  (Instructions for a balloon are here.)
When you set the wine aside to ferment, it doesn't look pretty.  It's foamy and brownish and cloudy.  In a few days the bits inside will settle and the liquid will clear.  I let my wine sit for 12 days before I strained and bottled it.  I strained it using a wire mesh strainer but now I wish I had put a coffee filter inside that wire mesh strainer as well.  I put it into 4 standard-sized wine bottles, corked them and put them away.  


This holiday weekend, we tried our wine.  It is good!  It's very sweet, though.  Researching online I see that with a short fermentation time one can reduce the sugar and also if you let it ferment longer, the sugar gets eaten in the process resulting in a less sweet wine.  It's quite citrusy, too.  I can see having lemonade coolers using this wine during the summer.  


Can you feel the anticipation?  


It is good!  I like it chilled.  

Thursday, April 19, 2012

Freecycle Score for the Garden!

Do you freecycle?  Freecycle is truly a grass-roots movement that's spread world-wide. Community members freecycle items to one another instead of sending those items on to landfills.  You can search for your local community at the link above.  Locally we started a plantcycle group to share garden plants with one another.

This is my most recent freecycle score:

This statue and birdbath were gifted to me by a local freecycler who no longer wanted them.

I think I'll be placing the boy somewhere else.  I can plant something shallow rooted in the base.  I'm thinking Sweet Alyssum, or perhaps a succulent or stonecrop of some sort.

It's enormous! About 3' across and 8" deep. 

It holds an 8" planter.  The hamster wheel in my brain is turning furiously trying to decide what I'll plant in it.  Something tall in the center, surrounded by something dangly.
What do you think? 
Last fall I saved this chair from the landfill by yanking it off the curb on trash day:  
It will be a planter when I'm done with it and I think it will go near the birdbath.  I will blog its transformation.  


Tuesday, April 17, 2012

Get Creative Growing Runner Beans

Runner beans are beans that grow on vining plants.  Usually runner beans are grown for dried beans instead of fresh green beans (though most runner beans can be eaten as fresh green beans when they are small and immature.)

Our two favourite varieties of runner bean are Scarlet Runner Bean (Phaseolus coccineus) and Rattlesnake Bean.  We like Scarlet Runners best because they are very productive, covered in a profusion of small red flowers that attract hummingbirds and butterflies, and have a delicate, sweet-nutty flavour.  The Rattlesnake Bean is also productive, though the vines don't grow quite as tall as Scarlet Runners will.  The flowers are paler, but also lovely.  The beans, if picked young, have that true green bean flavour that you might remember from childhood.  As dried beans, I found them unremarkable, though they do make a good addition to a cold bean salad.

Runner beans prefer to be planted in warm soil, so you have plenty of time in zones 7 and below to plan how you'd like to plant your runner beans.  

If you have children or grandchildren, you might like to plant the beans around a bean tepee.  Just be sure to leave an opening for the kids to enter.  Rattlesnake beans are perfect for the bean tepee as their colourful, twisted pods are fascinating to young (and old) eyes!  I didn't make the base of ours quite wide enough when I did this.  I recommend a diameter of about 10 feet.  Push poles into the soil, lean them together at the top center and bind well with twine.  You can reinforce with twine around the midsection, too.  Runner beans snake up vertically and do not need horizontal lines to grab onto, but plants like peas would.


Bean tepee filling in.

Bean tepee filled in.
 For something that doesn't take up a great deal of space, but gives an amazing yield; try growing runner beans up a single pole with multiple vertical lines running down to the ground from the center.  We use the shepherd's hook my brother made for me and all our other siblings for this every summer.  It's 7' high, impossible to uproot, and creates a visually appealing living statuary in the garden.  From 2' square of soil at its base, where the beans are planted, we yielded a bushel of beans last year!  We attached guide lines from the top of the pole to the soil in a circle for the beans to climb to the top.  At the top we ran twine to the corner of the garage.  The beans made it all the way to the corner by the end of the season!  That's about 20 feet!  I've heard of other people running twine from their house to the soil and creating a living wall that cooled the home and blocked bright sunlight in the summer months that would otherwise warm the house a great deal.  Imagine a wall of beans and scarlet flowers!

Scarlet Runner Beans growing up a 7' shepherd's hook and across twine.  

Note the size of the beans; the candle lantern is about 16" long from top to bottom.   

Here's a tip for removing the beans from the pods:  put the beans, once they are completely dry, on a tarp or in a burlap bag and walk on them!  That's A LOT easier than what I've done in the past, which left my hands cramped and my back sore!  

At the end of the season, don't yank the plants from the soil.  Instead, cut them off at the soil line and leave the roots to rot in the ground.  Beans are nitrogen fixers, meaning they pull nitrogen out of the air and convert it into food for plants.  Nodules, small bumps, will appear on the roots of beans and other nitrogen fixers (clovers and peas et.al.).  To let that nitrogen be available the following growing season, let those roots stay in the ground where the nitrogen will remain available for the next plants.  

Tuesday, October 18, 2011

Internet Resources for Gardeners

Plant identification, help with plant problems, and a great deal of gardening information can be found at the UBC Botantical Gardens Forums.  I have had many unknown-to-me plants identified by the members there and received a great deal of helpful advice.

Everything from gardening ideas, success stories, and advice can be found at the Garden Web forums.  Topics are well organized and plentiful.  I find it can be time consuming to search information in this forum because many topics can be quite long. That may also be due to my tendency to wander off topic when I find something that interests me.

The gardening section at The Old Farmer's Almanac contains a wealth of information easily accessed and understood.  I often refer to the planting dates (you can input your postal code or zip code and it will return information specific for your growing area) and even seed starting dates for your area. I find moon planting interesting, but I'm not sure if there's really anything to it.  My father planted 'by the moon' and was quite the successful gardener; but I can't say that the two are truly connected.

Monday, October 17, 2011

Old gardens, new gardens and resolutions

Three years ago we moved and I left behind the gardens I'd worked so hard to build.  It was a difficult, but necessary move.  In return visits I see the new owners have dug up or mowed over the 40 hostas and bed full of ajuga I'd planted.  I got a hernia planting that particular side yard.  Trees and bushes have been left to sprawl and the rock garden looks like a weed bed as it hasn't been tended at all.  It's a painful thing to see.  I know they are no longer mine, but all that work and effort has truly become a waste.

Because of that, I've taken a different approach to my gardening.  It is entirely for my enjoyment and more utilitarian than in past.  I know that we will not be at this location forever, either, so I'm not expending a great deal of efforts on permanent gardens.  Instead, I'm using more planters and the beds are full of annuals.  They can easily be seeded with grass once we're done here.

I like planters because they are portable, I control the growing medium (instead of the soil controlling me as is often the case with difficult soils), I can manipulate the light they receive easily, and one planter is more easily remedied than a bed full of disease or pests.

I've been avidly reading Question and Planter.com  for tips and suggestions and finding that I seem to hoarde the knowledge I've gained over the past 30 years to myself.  It isn't intentional.  I often do not realize that some of what i know is not common knowledge. Not everyone grew up with a landscaping father who taught his kids as much of what he knew as he possibly could over the years.

I'm not making promises as I'm fairly busy, but I am going to try to post more frequently and share information that I find invaluable even if I think it is common.

Are you planning next years' gardens yet?

Tuesday, August 23, 2011

More Zucchini! More Zucchini Recipes!

Zucchini, just right for sauteing.


It's a single hill of bush-type zucchini and took over the entire row by the end of the season,
and crowded onto the next row, too.  The rows are 6' across.  

This is the first year I've grown zucchini.  It's always so cheap at the farmer's market -- they're nearly giving the stuff away.  The plant looked lovely in the greenhouse this spring and I had an empty row in my garden, so I figured why not.  It's a fairly fuss-free plant without many issues.  Powdery mildew attempted to get a start thanks to the weather and whatever bugs dragged it in on their feet, but we halted that.  It's so simple to grow, I'm saving seeds for next year.

I promised more recipes, and here is another:

Zucchini-Pumpkin-Raisin Quickbread

  • 1/2 c vegetable oil
  • 1 cup sugar (I mix 1/2 cup brown and 1/2 cup white/splenda)
  • 3 large eggs
  • 1 tsp vanilla
  • 2 cups shredded zucchini
  • 1 cup solid-pack pumpkin (not pumpkin pie filling)
  • 2 cups flour
  • 2 tsp cinnamon
  • 1 tsp nutmeg
  • 1 tsp baking soda
  • 1/4 tsp baking powder
  • 1 tsp salt
  • 1 cup raisins 
  1. Mix first 2 ingredients in large bowl.  
  2. Add eggs and vanilla, mix well. 
  3. Add zucchini and pumpkin, mix well.
  4. In a separate bowl, mix remaining dry ingredients.  
  5. Add dry ingredients to large bowl and mix until just combined. 
  6. Stir in raisins. Pour mixture into a single large loaf pan or four small loaf pans.    
  7. Bake at 350 for 1 hour (large loaf pan) or 30 minutes for 4 small loaf pans.  Cool in pans for 15 minutes, then remove to wire rack to cool completely before slicing.  
Remember that extra large zucchini in my last post?  I've only used half of it so far.  
Bake 

Monday, August 22, 2011

What to Do with the Fruits of the Harvest


Yes, that is a very large zucchini. More than a foot long and about 6" diameter at its widest point.   While we like a bit of young (small) zucchini sauteed with other vegetables, the whole family loves when I use the larger ones for baking.  

My husband didn't think he'd like zucchini bread so I developed the following recipe to suit his tastes.  It's always a hit.  I make several loaves, slice them and freeze the slices to add to lunchboxes throughout the year.  

Spiced Zucchini Raisin Quick Bread

  • 2 cups flour
  • 1 tsp baking soda
  • 1 tsp baking powder
  • 1/4 tsp pumpkin pie spice
  • 1 3/4 tsp cinnamon
  • 1 tsp salt
  • 1/2 cup brown sugar
  • 1 cup sugar (I use splenda and I've often reduced this to 1/2 cup without any complaints)
  • 2 eggs
  • 1/2 cup oil
  • 1 tsp vanilla
  • 2 cups shredded zucchini (you can add up to 3 cups without distorting the flavour or texture.  It just gets more moist! Leave the peels on when you shred it.)
  • 1/2 cup raisins
  • 1/2 cup milk

  1. Sift the first 6 ingredients together in a bowl.  
  2. Mix the next 5 ingredients in a separate, large bowl.  
  3. Add the dry ingredients to the large bowl slowly, alternating with the milk until fully mixed.
  4. Stir in the zucchini and raisins. Pour into one large or four small loaf pans.
  5. Bake in a 350 oven for 30 minutes (four small loaf pans) or one hour (a single, large loaf pan.) 
  6. Cool for 10 minutes in the pans, then remove from pans to wire rack to cool completely before slicing. 


I'll be posting more recipes in the coming days.  Afterall, what do we garden for if not to enjoy the fruits of our labours?  

Wednesday, October 8, 2008

Holy Fat Carrots, Batman!


Yeh, the centimeters don't mean anything to me, either. They're about 6" long & 6" across. The really fat one, I need to take a tape measure to it, because I think it's about 10" circumference. These were winter storage carrots that got so darned fat. My other carrots were long and pretty thick, too, but nothing like this! Have a half bushel to slice & freeze this week.

Monday, September 29, 2008

Gardening Mistakes I Hope Not to Make Next Year

I don't think I want to plant sunflowers near my vegetable garden. Two years in a row they are covered in powdery mildew and spread it on to the other plants. I love the sunflowers, don't get me wrong. I do not like my cucumbers covered in the powdery mildew. I'll see if the city will let me plant them around the telephone pole in the tree lawn. I think they'd be happy there and my veggies will be safe.

Peppers....I'll plant them much earlier next year and start them inside much earlier than I did last year. I think we got started in March. I'll try early February next year so that they're much larger.

Maters....I won't crowd them so much. Though they did fine, it's a real pain to pick them and I think they'll mature more quickly with a bit more space.

Beans....I'm planting more of them, a different variety & I'll have a finch feeder nearby. Those bean beetles really pissed me off.

Nematodes. I'm buying some as early as I can. The kind that eat all the bad nasties hiding in the soil waiting to eat our plants...like those bean beetles. Grrrr.

Better soil in the square foot boxes. I'm not entirely sold on Mel's Mix though I might have to try it in one box just for comparison. I don't like the idea of using Peat Moss so heavily. Despite what the Canadian government says about our Peat Moss supplies being perfectly fine...it's still a limited resource and what kind of damage are we doing to the environments from which we strip it?

I'll use more of my front flower beds for vegetables. I have plans, oh I have plans. I had tomatoes out there this year and they tasted amazing being next to a garden oregano plant. Just wonderful. Now I'll plant a few more things out there.

I'm sure there's more, but that's all I can think of for now.

Sorry for the long absence. Gardening has been kind of sucky recently, plus my camera was broken so....no pictures.

Sunday, August 31, 2008

Chinese Lantern Harvest

Remember that patch of Chinese Lanterns?

I harvested several stems full of them, defoliated the stems, then bound one end in twine:
Then I sprayed the lanterns with hairspray and hung them to dry:

Saturday, August 30, 2008

SON OF A BEAN BEETLE!

So I went out to harvest beans yesterday and guess what I found?


You know what those fat, yellow, fuzzy suckers are? Mexican Bean Beetle larva. And they seem to have prodigious appetites.

While harvesting beans from my bush plants (barely any nibbles on those plants) I noticed that the leaves of the bean tee pee were looking much more chewed than they had previously. Previously I found only two adult beetles on the tee pee. It seemed almost immune. Not so, obviously.

Take a look at the leaf damage:


The Mexican Bean Beetle is the black sheep of the ladybug family. Ladybugs eat other damaging bugs in our gardens, but the Mexican Bean Beetle likes to chomp on bean leaves (and the beans, too!) RJ, my nine-year-old, was most upset when he thought I was drowning ladybugs. Here is what the adults look like. (Most of mine have been bright red, but some were paler yellow-orange).


I know my picture of the larva is rather hard to see, so here's a much better picture I found on the 'net:


My shoulders are actually sore from picking these suckers off my bean leaves and drowning them. There were SO MANY of them! I know there are more, but my soreness turned into a pinched nerve and ended my bug harvest. Hubby's out picking them now. I don't know why the beetles decided to go and lay their eggs on my tee pee plants since those were not the plants with the most beetles on them. I guess they figured there wasn't much eating left on the other bean plants.

Relatively few of the beans were damaged. I picked about 4 quarts and tossed only a handful, so at least they're not overly damaging the harvest. I understand later in the season they will go after the beans more.

I had sprinkled the leaves with diatomaceous earth, but it seemed to do nothing to deter the nasty bugs. Next year (it's too late this year) I could order the spined soldier bug from Natural Insect Control, a local company. They're rather expensive for the small number of plants in my home garden, though. I can also erect finch feeders near my bean plants, which is what I will most likely do. Finches will happily snack on Mexican Bean Beetles. I will continue to handpick and drown (in soapy water) the adults and larva I find. I could also try to find a supplier for the parisitic wasp Pediobius foveolatus. Price is a factor. I truly cannot afford to spend $100 on bugs to kill bugs in my garden, nor would I need as many as $100 would buy. That kind of expenditure completely negates the frugality of home gardening.


Now about that bean harvest:

Thursday, August 28, 2008

Is Your Garden Addicted to Miracle-Gro?

Did you ever use it and have wonderful results, then the next year not use it and have terrible results?

Well, here's why...Miracle-Gro and other synthetic fertilizers strip the soil of nutrients. Wash them right out. It also salinates the soil (salts the earth) and makes it a very unfriendly place to nematodes, worms, and other critters that break down organic wastes and feed the soil and plant roots around them. The processes by which synthetic fertilizers are made is extremely hard on the environment. Those processes use incredible amounts of energy and create enormous amounts of waste.

Synthetic fertilizers only consider the three big nutrients for plants: Nitrogen (N), Phosphorous (P), and Potassium (K). Putting plants on a synthetic fertilizer diet is like putting a person on a diet that ONLY contains Protein, Carbohydrates and Fat --- no iron, vitamin C, magnesium, etc., just the big 3 macronutrients. Everyone knows we need more than just protein, carbs, and fat. So do plants. Calcium deficiency shows up in some plants as black roots, pale leaf margins and, in tomatoes, blossom-end rot.

Synthetic fertilizers are short acting and water soluble. Meaning only about 15% of what you add to your soil is used by the plants and the rest is rinsed away with the rain. Synthetic fertilizers are to blame for nitrates in our drinking water.

I suspect a lot of people think that synthetic fertilizers (like Miracle-Gro) are vitamins for plants. Since chemical fertilizers strip soils of the natural nutrients that plants need, soils and the plants grown in them become dependent upon those chemical fertilizers. That really makes synthetic fertilizers more like a drug than a vitamin and their relationship with soil and plants an addictive one. The synthetic fertilizers have to continually be added to the soil in order to feed the plants the nutrients they need. Why? because those fertilizers denude the soils their beneficial nutrients and organisms. It's kind of like a human taking speed to get a bit of oomph instead of eating a piece of fruit for the same oomph. Studies have also shown that synthetic fertilizers actually REDUCE the nutritional value of fruits and vegetable grown using them. How's that for a drug?!

What is preferable is organic fertilizer. There are about a million different kinds. Bacteria dwelling in the soil will fix nitrogen out of the air into the soil for plants to use. That bacteria will be present if it hasn't been killed off by synthetic fertilizer use. Certain plants are better at fixing nitrogen than others. Clovers and all legumes are nitrogen fixers. They suck enormous amounts of nitrogen from the air and store it in the soil for future plants to use. Phosphorous can be gotten from crushed phosphate rock, bone meal, dried blood, cottonseed meal and other sources. Potassium (potash) can be gotten from plant residues (in the form of wood ash), manures & compost and natural mineral sources such as granite dust, greensand and basalt rock. Seaweed and seaweed extract are also excellent sources of potash.

Soil really needs to be viewed as a living organism requiring a wide range of nutrients in order to support the many life forms within it-- from plants to worms and bacteria to fungus.


I use compost, manure, mulch, wood ash, nitrogen-fixing plants, seaweed extract and fish emulsions to feed my plants and nourish my soil. The great thing about any of these is that they can stay resident in the soil for future generations to use and do not convert to toxins in the soil or pollute our waters. That's conscientious gardening. I purchase my seaweed extract and fish emulsion from Stokes.

Monday, August 25, 2008

Garden Photos August 25

I'm sorry. I feel as though I've been neglecting this blog. We're still gardening along. Pictures from today.

I suppose I could have taken the pictures after mowing the grass, but I didn't. I took the pictures, first! Haha!


How about we start with the green beans:
These are growing vertically up a twine trellis. As you can see, the leaves have been nibbled some (and sometimes the beans too.) I've never had bean beetles before this year. I don't know what my luck had been, but when I finally noticed them I had quite a few. I picked about 20 off my 8 plants in this bed and another two or three from the bean tee pee. This bed has been stressed since the beginning of the season. The soil is not right for this bed and will be changed next year. Because the plants in this bed have been stressed all year, they're more prone to insect attacks. I not only found Mexican Bean Beetles chomping these bean leaves, I found cucumber beetles on them too (but not on the cucumbers!) Go figure. My treatment: handpick them and drown them in soapy water. Haven't seen any eggs on the undersides of the leaves, so that's a good sign.

The bush beans in the same bed are much less stressed than the others, but they germinated very poorly. About 1 out of 10 germinated. Had all of them germinated, I would have enough to freeze for the rest of the year. As it stands, we've got enough for fresh eating and maybe a few more meals after the growing season. These beans are strong producers. I like to pick them on the day we'll eat them, so these are staying until tomorrow. Both the beans above are tender, stringless beans that cook up in just a couple minutes. They're great for stir-fries as they cook so quickly. Quite tasty and very light!
The bean tee pee filled in quite nicely. It's very full of rattlesnake beans. They're quite yummy! They have the traditional bean flavour but require a little more cooking time than the French Fillet beans above. Just a little, though. Later in the season, they'll probably require a much longer cooking time. I do cook them shortly after picking them, though.


It's taken the bell peppers (California Wonder) a lot longer to produce fruit than the others. They're coming along, though as you can see.

These Super Chili Peppers are VERY PRODIGIOUS PRODUCERS. I outlined all the visible peppers so you could get an idea of how many are in there. There are far more on the lower branches, and as you can see, many many blossoms still. We have three of these plants and I'd say that's two too many for us. I'll donate some to the local food banks and freecycle others. Those we keep I will dry and store for use in stir-fries. We like 'em hot!


Our sunflowers this year are ginormous! The landing on my porch is 5 feet from ground level. That's just below the height of the Canna Lilly's bloom. That center sunflower is about 14 feet high! It has numerous blossoms on it that haven't yet opened. I think my sunflowers cross-pollinated last year as these are all from my own seed stock. I had a volunteer Kong sunflower show up in my memorial bed last year -- a gift from a visiting bird. It was about 8 feet tall and had more than 30 blossoms on it. I had also planted Russian Giants which got 6-8 feet tall and had one very large central blossom, nearly a foot across. This year I've got 10 foot sunflowers with multiple blooms, some of them very large, others much smaller. Very interesting. And as you can see, one of my Cannas bloomed! Yay!

These are "only" about eight feet tall. The birds love them. To the right is a giant blossom that has been a favourite haunt of the neighborhood birds lately.


Check out the sunflowers growing through the porch rails. These ones do have pale petals. I don't know why. The birds still think they're good eating. Anyone placing bets on how many volunteer sunflowers I'll have next year? Next year I won't plant them here. I will, if I'm allowed, surround that telephone pole out at the curb with them. That'll make the birds happy! No, I don't harvest the seeds for myself, though I love sunflower seeds. It's just so much darned work! I buy my sunflower seeds already hulled, thank you! I do harvest heads for seed saving, though. Anyone want some?


I'm always amazed by cucumber growth spurts that happen overnight. This thing was about 4 inches long yesterday morning. Then we had some rains in the afternoon and today it's 8 inches long. Amazing! I'll pick it and another will take its place in no time!

Hubby's old work boots recycled into hen & chick planters. These were just planted this year, too. Man, those things reproduce fast! I'll have another pair on a lower step next year!

Check out the beautiful Chinese Lanterns! Wow! They're nice sized, too. I planted these last year and the lanterns averaged about an inch long, one and a half inches around. They're triple that this year! And what great colour! I'll be harvesting these soon. (Trim the stalks, trim away the leaves. Spray the lanterns with hairspray, and hang to dry. They'll retain their colour and make a lovely holiday decoration.)

A closeup of some of the lanterns. With my hand there, you can get an idea of how big those lanterns are. Chinese lanterns are invasive and will take over a garden. We planted them in a whiskey barrel to keep them in check. SO far so good. I think it helps that we harvest the lanterns (there is an edible berry inside the lantern, which also contains numerous seeds. The berries are like tiny tomatoes with hundreds of seeds in each.) I don't eat the berries. They taste yucky.

blogger templates | Make Money Online